


10 Sustainable DIY Halloween Costumes with Terrera

If you’re anything like us, you’ve gotten so busy with Thanksgiving this year that you’ve forgotten about Halloween! Or you’re way ahead of schedule and are already planning next year's costume! Whichever it is, you’re probably looking for a costume.
This year we’re focusing on DIYing our costumes as a more sustainable option! Traditional store bought costumes are expensive and made of cheaper fabrics and harmful dyes. It’s fun to dress up, but do so with the Earth in mind! DIYing is a great sustainable and budget-friendly option - it’s also a great experience to make your own costumes as a family!
So now that you’ve decided to make your own costume, where to start? We’ve put together a list of 10 DIY options for Halloween 2022 to help you get past the first and last steps - what to be and how to make it!
1. Stick Figure

If you’ve seen those glow-stick figure dances online, you’ll know exactly what this costume is about! Perfect for when it gets dark outside, this costume is so easy to assemble, and you can wear it year after year as long as you refresh the glow sticks.
What you’ll need:
- 20-30 glow sticks, depending on their length and your size
- Black shirt & pants (we recommend Terrera’s Black Kamea Side-Zip Bamboo Fleece Sweatshirt and Black Viva Pocket Leggings)
- Double-sided tape
- Packing tape
Instructions:
- Try on the black shirt and pants to see where they overlap. Then take them off and lay them flat, overlapping them as if you were wearing them.
- Use the double-sided tape to draw out the stick figure on the clothing. Use a circle for the head, and straight lines for the body and limbs.
- Crack each glow stick to illuminate it, and then lay it on top of the double-sided tape.
- Go over all the glow sticks with packing tape, to ensure they stay adhered through your evening of trick-or-treating!
2. Minnie Mouse

Minnie Mouse is such a classic costume and it’s fun to make! It also opens the opportunity to do a family or friends themed group costume!
What you’ll need:
- Red dress (We recommend our Mina Hoodie Dress in Cranberry for a warmer option!)
- OR Red shirt (like our Georgia Crew Long Sleeve) paired with a black skirt!
- Cardboard
- Black paint
- Paintbrush
- Hot glue gun
- Sharpie
- Old headband
- Bonus: white felt + safety pins
Instructions:
- Begin crafting Minnie’s ears by first laying the headband down on the cardboard. Draw 2 circles for the ears around the headband to make sure they will sit nicely on the headband when glued.
- Cut out the circles from the cardboard
- Paint the 2 ears with black paint
- Once dry, use the hot glue gun to glue the ears onto the headband.
- Take your red hair bow and glue it in between the two ears.
- Bonus: To really complete Minnie’s look, trace out some circles using a black marker and white felt.
- Cut out the circles and attach to your dress or skirt - whether you’re going for a red dress and leggings, or a black skirt and red top.
- This creates Minnie’s iconic look without ruining your dress or skirt!
- Finally, piece the outfit together! Put on your dress or skirt and top, add the headband and your choice of shoe (either sneakers or heels!) and you’re set!
3. Deer

A classic, and perfect if you have a lot of brown neutral shades in your closet already! We recently released our new colour “Latte” and we immediately thought how great this would work for a deer halloween costume.
What you’ll need:
- A light brown coloured hoodie (try our Silvia Hoodie in Latte)
- A matching jogger or sweatpant (Kora Jogger in Latte to match!)
- Brown felt / construction paper
- Hot glue gun
- Headband
Instructions:
- Beginning with the ears, start by tracing out a deer ear shape onto the brown felt or construction paper. A quick google for a pattern would be useful here!
- Cut out the ear shape.
- Glue the ears onto the headband with your hot glue gun.
- After assembling the ears, you’re ready to put on the outfit! Put on your matching brown tracksuit of choice and your new ears.
- Top off the look with some makeup - we recommend colouring the end of your nose in a dark brown shade and doing a doe-eyed makeup look!
4. Sushi

Dressing up as food is always a popular choice, and sushi is a versatile one! As a bonus, it’s easy to dress up your kids or even a pet to match. All you need is the base, and then you can customize the sushi “topping” to make it your own.
What you’ll need:
- White shirt or t-shirt (try the Aurora Seamless Bamboo Long Sleeve or the Lia Seamless Short Sleeve Tee)
- Black pants, like the Suri leggings in Black
- Pillow
- Pillowcase in your sushi colour (try yellow for egg, orange for salmon, or our new Rosewood colour for tuna - you can put the pillowcase in our Hush Bamboo Sleep Dress!)
- White felt
- Thick black belt or long strip of black fabric, approximately 4 inches wide and 4-5 feet long
- Safety pins (for a temporary fix) or fabric glue (to permanently alter your pillowcase)
Instructions:
- Cut 5-6 strips of white felt, around 12” x 2”, and taper them at the ends to look like the stripes in the sushi fish. You can cut more or fewer strips, depending on the size of your pillow.
- Using either safety pins or fabric glue, adhere the white felt strips to the pillowcase of your choice, spacing them out to create diagonal stripes.
- Taking your white shirt, lay it so the back is facing up and pin one layer of the top half of the pillowcase to the back of the shirt, taking care not to damage the fabric.
- Put your pillow inside and close the pillowcase.
- Put on the white shirt (with pillow attached) and black pants, and strap the pillowcase to your back using the black belt or strip of black fabric.
- You can make something similar on a smaller scale by stuffing colourful t-shirts with cotton batting and tying them onto your child!
5. Starbucks Drink Cup

This one is so fun - dress as your go-to Starbucks order! This costume involves some creativity and crafting, so if you have a bit more time on your hands, it’s a great option!
What you’ll need:
- Brown or beige colour sweater / tunic / dress (we recommend our colour ‘Latte’ - it’s the perfect Starbuck coffee colour! Try it in the styles Lindsey Poncho or Bridget Dolman Top for this look!)
- Your favourite pair of leggings
- Safety pins
- Tape safe for fabric
- White infinity scarf
- Printer paper
- Computer and a printer to print out the Starbucks symbol OR if you’re an artist, a green and black marker to draw the logo yourself!
- Paper towel roll
- Green paint
- Paint brushes
- Headband
- Hot glue
Instructions:
- To make the drink cup, we need to start with the iconic logo. Start by laying out your beige/brown top/dress of choice on a surface
- On your computer: print out the Starbucks green logo and cut it out OR if you are drawing it, grab your white printer paper and begin sketching out the logo. Colour it in green, and cut it out.
- **To make sure no damage is done to the garment, use safety pins to pin the logo into place on the garment.
- To craft the straw, take the paper towel roll and paint it with green paint
- When dry, glue the bottom of the paper towel roll to the side of the headband with your hot glue gun (the straw should be on a slight angle when you’re wearing it!)
- Now it’s time to assemble the outfit! Put on the drink cup garment and your favourite black leggings, layer the white scarf on your neck, and top off the look by adding your straw headband!
**Note: it may be easier to attach the logo with safety pins while wearing the garment to avoid crumbling the paper when putting it on. Just be careful not to pin yourself!
6. Wednesday/Morticia Addams
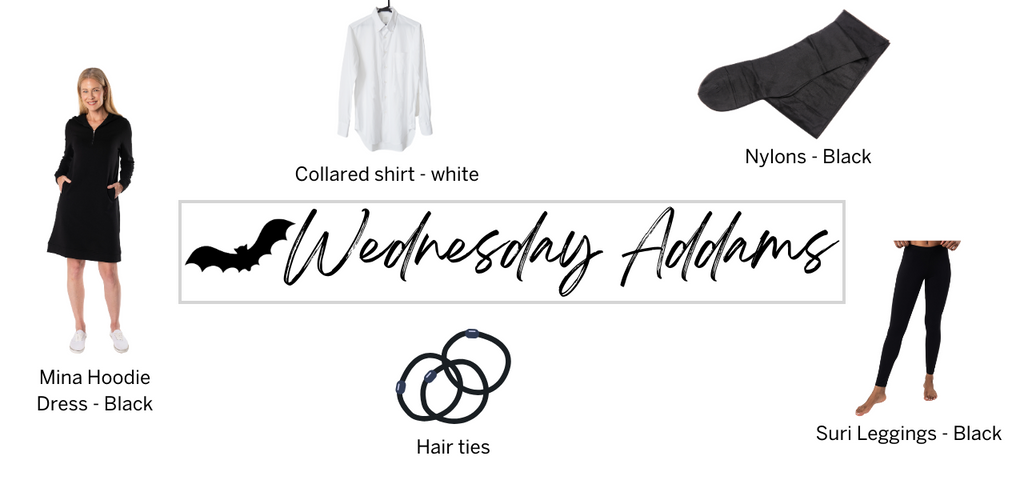
With the new show coming out, now’s a great time to dress as Wednesday from the Addams Family! Wednesday is known for her iconic all-black outfits and braided pigtail hair style. Luckily, this is another minimal effort but cute costume! If you want to go for a more sophisticated look, dress as Wednesday’s mother, Morticia, instead!
What you’ll need:
- Hair ties
- Black dress (we prefer a long sleeve dress, try our Joanna Mock Neck Dress!)
- White collared shirt
- Black nylons
- For added warmth, switch out the nylons for black leggings (like our customer favourite Suri Leggings!)
Instructions - Wednesday:
- Another easy costume! Just assemble your outfit. Put on your nylons or leggings, white collared shirt, and layer the black dress of choice over the shirt. Pull out the white collared shirt so it is over top of the dress neckline
- Braid your hair into two pigtail braids to complete the look!
Instructions - Morticia:
- If you’re wanting to go as Morticia rather than Wednesday, assemble the same outfit without the collared shirt - a black dress paired with nylons or leggings
- Morticia has long straight hair, so for this look, wear your hair straightened and parted in the center
- Add a dark red lipstick and some black eye makeup to complete this look!
7. M&M

M&Ms aren’t only a delicious treat, they also make for a cute costume! The best thing about this idea is that it can be a great group costume - each of your friends or family can join by wearing a different colour to match the classic chocolate candy!
What you’ll need:
- A coloured t-shirt to match the colours of M&Ms (e.g., blue, green, red, yellow, brown)
- A white thermal long sleeve for warmth and layering (our Aurora Seamless Long Sleeve was made for this job!)
- Black leggings (we suggest one with a pocket, like our Viva Pocket Leggings)
- Felt or an old black shirt to cut into fabric
- Safety pins or fabric safe tape
- Chalk
- Scissors
Instructions:
- Begin by creating the letter ‘m’ on either the felt or old t-shirt. Use the chalk to draw onto the fabric of choice.
- Cut out the ‘m’
- Attach to the coloured shirt with the table, and reinforce with safety pins if needed (this way it saves the shirt to be worn again!)
- Now you just need to put the thermo shirt on first, then layer the coloured t-shirt with the ‘m’ on it, and throw on your leggings!
8. Cat/Bear/Dog, or another animal!

Stay warm as you trick-or-treat by using our Devyn jumpsuit as a base for lots of animals! You can dress up as a cat, bear, dog, or some other animal that has black fur.
What you’ll need:
- A black jumpsuit, like our Devyn Bamboo Lounge Jumpsuit in Black
- Black felt
- Headband
- Hot glue gun
- Black eyeliner or face paint
Instructions:
- Cut triangle or circle shapes out of the black felt to make your animal’s ears. Try to make them quite large, so they have more visual impact.
- Using the glue gun, glue the bottoms of the felt pieces to the hairband so they stand up.
- Take your black eyeliner or black face paint and paint a nose, whiskers, or other animal details on your face.
- Finish off by slipping into your black jumpsuit and you’re all ready to prowl around for candy!
9. Lady Bug

If you were looking for a reason to buy an adorable red poncho - this is your sign! Our Lindsey Poncho just came out and we love the outfit potential with this piece. Whether you’re going apple picking, viewing the Christmas lights, or going on a coffee run, this piece is a wardrobe staple. It also has great costume potential, the best one being a Lady Bug! With a few modifications, you’ll be flying away in no time!
What you need:
- 2 black pipe cleaners
- Red poncho - Our Lindsey Half-Zip Poncho in Cranberry is a great shade of lady bug red!
- Your favourite pair of black leggings (we love our Terry Leggings for a warmer option!)
- Chalk
- Safety pins
- Headband
- Scissors
- Hot glue gun
- Old black t-shirt OR black felt
Instructions:
- Start by preparing the spots for your poncho. Begin by drawing out some different sized circles on the fabric of your choice - either black felt or an old black t-shirt!
- Cut out the circles
- Use safety pins to attach the circles to the poncho without damaging the garment.
- Take the pipe cleaners and roll the end up a little to make a tight spiral but still keep them fairly long.
- Bend the other end about ½ inch to create a base to glue to the headband
- Use your glue gun to glue the pipe cleaners to it - space them out a bit like antennas!
- Now throw on a layering piece (like our Aurora Thermal Top), your leggings, and the spotted poncho! Top it off with the headband and you’re ready for the costume party!
10. Russell the Boy Scout, from the movie Up!

A brave and loyal character, Russell from Up! is one of the sweetest animated heroes. If you’re a button-collector, this costume will be easy for you to re-create!
What you’ll need:
- Yellow shirt (if you’re going for a warmer look, you can try our Yasmine Button-Front Bamboo Cardigan in Warm Brown instead!)
- Brown pants (we recommend our Samira Wide-Leg Bamboo Pant in Coffee Bean)
- Orange handkerchief or bandanna
- Yellow baseball hat
- Brown felt or fabric for the sash, approximately 3-4 inches wide and 5 feet long
- Small badges/buttons or colourful felt circles (for the badges on the sash)
- Safety pins
- Balloons and long stick (optional)
Instructions:
- Decorate the brown sash with the badges/buttons, so the front of the sash is covered (Russell is a great boy scout so he’s earned a lot of badges!).
- Put on the yellow top and brown pants.
- Fold the orange handkerchief or bandanna in half so it’s a triangle. Tie it around your neck so it knots at the front.
- Put the brown sash across your body and over your shoulder. Pin both ends together at your hip.
- Put on the yellow baseball hat, and you’re ready to go!
- If you’re feeling extra ambitious, you can blow up some balloons and attach them to a stick to carry with you!
Leave a comment